Claim Searches & Statuses
All claims entered in to ClaimConnect are searchable and can be reviewed at a later time regardless of claim status once they have been assigned a Claim ID.
Visit our Video Library for more helpful tutorials.
- From the Dashboard page, under Electronic Claim Services, select the Claim Search button, or
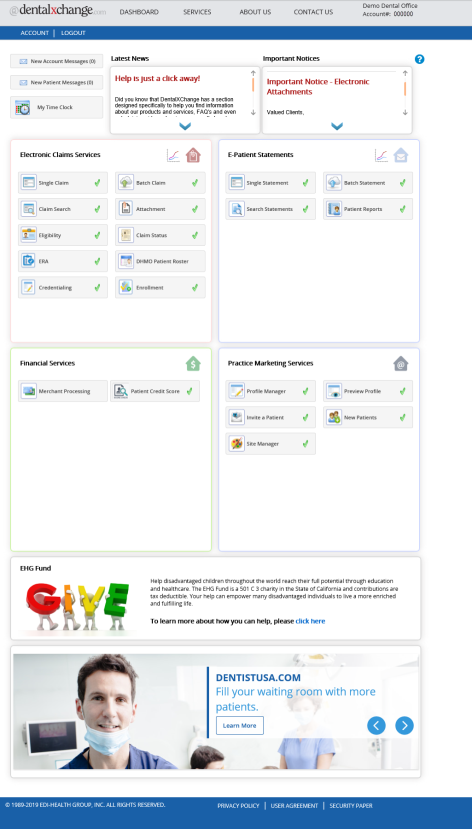
- From the Welcome to ClaimConnect page, under the Submission section, select the Claim Search link.
Claim Search Page
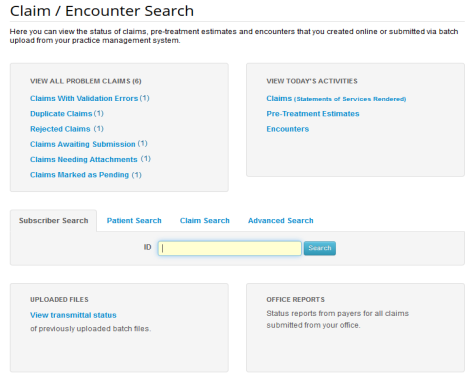
- The Claim/Encounter Search page features quick links to review problem claims, today’s activities, uploaded file transmittal status, payer status reports, and a claim search tool bar display.
- Select the link below to view the video tutorial on this subject.
-
 Find a Claim
Claim Statuses
DentalXChange provides a streamlined claim experience by conducting initial claim information verification. This verification assigns a status to a claim in order to not only give providers updates on which part of the adjudication process a claim has reached, but also to identify claims that may cause a delay in the process.
- During claim searches, claims display in a table format with several available links and actions.
- Select the Claim ID or Status link in the Claim ID column or Status column respectively to view the claim and any applicable errors.
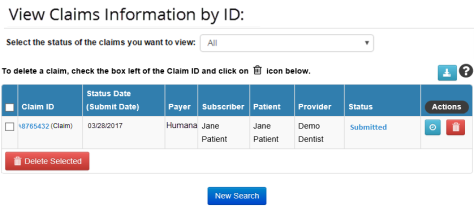
- Hover over the Info button for an explanation of the available Action buttons.
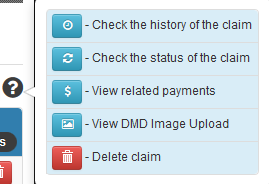
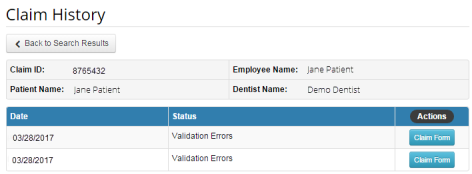
Select the History button  to view a complete claim status history.
- Select the link below to view the video tutorial on this subject.
 Research Claim History
- Select the Delete button
 to change the claim status to deleted.
 - Select the Refresh button
 to refresh the claim status (Real-Time providers only, available during select statuses).
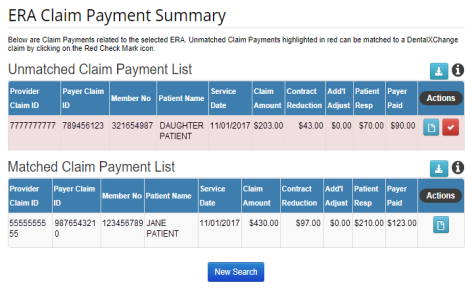
 - Select the Payments button
 to view a list of related claim payments (only available to providers who receive ERAs through ClaimConnect).
- Common ClaimConnect Claim Statuses include:
- Validating – When a batch of claims is submitted to the DentalXChange website, the first viewable response will be validating. DentalXChange reviews the claim file and verifies all information submitted is valid based on industry standards.
- Note: This status only applies to claim batches. Claims entered as DDE Claims are automatically validated page by page while the claim is being entered.
- Validation Errors – If a claim has information missing or does not conform to industry standards, it will be flagged with a validation error and will not be sent to payer until it is corrected. Validation errors usually apply to provider, patient/subscriber or procedure code information.
- Ready for Submission – The claim passes all validation requirements and has been saved by provider for later submission. The claim can still be edited before it is submitted.
- Attachments Needed – The user has entered a claim requiring an attachment and has not yet included the attachment or is working a claim that was previously flagged as having a validation error.
- Duplicate – Claim has already been submitted to DentalXChange website within past 10 days.
- Submitted – Claims has passed all validation and is in transit to payer. When a claim has reached the Submitted status the DentalXChange account will be charged for the cost of the claim based on the claims package on the account.
- Received – Claims with this status have not only been submitted to the payer for adjudication, but have also been acknowledged at the payer. Claims with a received status have not been processed by the payer at this time.
- Received/Suspended – Claim is on hold by payer for additional verification. Insurance payer may request additional information before completing processing of the claim.
- Rejected – Claim has been rejected by insurance payer or DentalXChange.
- Processed – Claim has been adjudicated and is complete. Adjudication includes payment and denials.
- User Resolved – Response is selected by user. Allows user to create notation and discontinues all further processing or actions on claim. This is a final status.
- Deleted – Response is selected by user, discontinues all further processing or actions on claim. It allows provider to mark claim as deleted on website and still reference later. This is a final status.
- Resubmitted – Claims with the status of resubmitted are claims that were created from a claim that was originally rejected. In this case, the provider has resubmitted this information with any corrections or updates for adjudication. The Resubmitted status applies to the old claim that was previously marked as Rejected.
- Processed – Claims with the status of processed have completed the adjudication process. This may include either a claim that resulted in a payment or a denial.
- Select the link below to view the video tutorial on this subject.
 Understanding Claim Submission Statuses
 Understanding User Generated Statuses
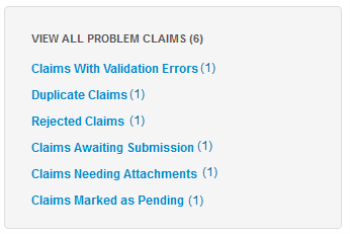
View All Problem Claims
Claims that have been identified as ones that may cause a delay in the adjudication process due to missing or incorrect/incomplete information are collectively referred to as problem claims. Problem claims may have errors and/or need additional information or corrections before they are sent to or processed by the payer.
- Select the link below to view the video tutorial on this subject.
 Understanding Problem Claim Statuses
- Quick links indicate the number of claims in queue.
- Select a problem claims quick link to proceed.
Claims with Validation Errors
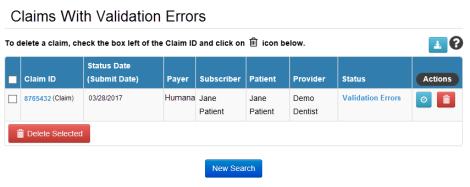
Claims with Validation Errors are claims that have information that is missing or does not conform to industry standards. Claims will be flagged with a validation error and will not be sent to the payer until corrected. Validation Errors usually apply to provider, patient/subscriber or procedure code information.
- Select the link below to view the video tutorial on this subject.
-
 Correct a Claim with Validation Errors
 Create a Secondary Claim with a Primary Claim
 Create a Secondary Claim After a Primary Claim
- Select the Claims with Validation Errors (#) link to view the list of claims.

- Select the Validations Errors link in the Status column to view the errors.
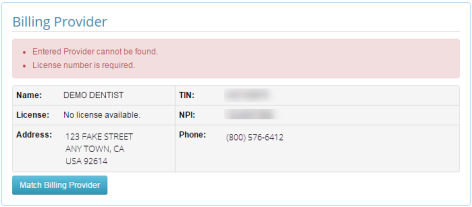
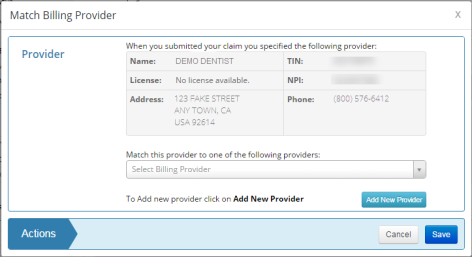
- Every first claim entered for each provider will result in a provider match validation error.
- Select the link below to view the video tutorial on this subject.
 Complete a Provider Match
- Review the error message at the top of the page and navigate to the section of the claim with errors.

- Select the available button in the section of the claim with errors to make corrections.
- Available buttons vary depending on the validation error being addressed.
- Complete the available actions in the pop-up window that displays.
- Select Save to proceed.
- When all errors have been addressed, select an action at the bottom of the claim to proceed.

- Select the Submit Claim button to submit the claim to the payer.
- Select the Save Claim button to change the status of the claim to Waiting for Submission.
- Select the link below to view the video tutorial on this subject.
-
 Save a Claim for Later
- Select the Delete Claim button to change the status of the claim to Deleted. Deleted claims are not submitted to the payer.
- Select the link below to view the video tutorial on this subject.
 Delete a Claim
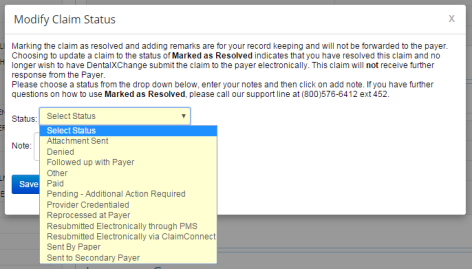
- Select the Mark as Resolved button to change the status to User Resolved.
- Select one of the available reasons in the Status field.
- Provide any additional notes in the Note field.
- Note: Selecting Delete Claim or Mark as Resolved for a claim with an open attachment will result in the attachment being deleted. The attachment will not be sent to the payer.
- Select the Mark As Pending button to change the status to Pending. This allows the provider to gather additional information required prior to submission to insurance.
- Claims updated to the User Resolved statuses will not be submitted to the payer.
- Select the Print button to view/save/print a PDF version of the claim.
Duplicate Claims
Claim duplications that are successfully submitted to a payer will be rejected if submitted within 10 days of the original, regardless of the final payment status of the original. For this reason ClaimConnect assigns a Duplicate claim status to any claims that have been duplicated through DentalXChange within the last 10 days. Claims with the duplicate claim status are on hold until the error is removed.
- Select the Duplicate Claims (#) link to view the list of claims.
- Select the link below to view the video tutorial on this subject.
 Submit a Duplicate Claim

- Select the Duplicate Claim link in the Status column to view the errors.
- Note: Claims duplicated outside of the 10 day period will not be assigned the duplicate claim status.
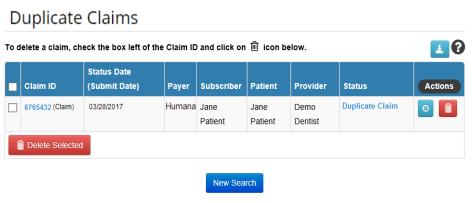
- The duplicate error message displays at the top of the page.

- Select an appropriate action at the bottom of the page.
- Select the Remove Duplicates button to remove the Duplicate Claim error.

- The Claim Form displays with new actions available at the bottom of the page.
- Edit the claim as necessary before resubmission.

Rejected Claims
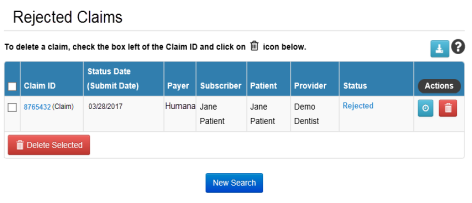
Rejected claims are claims that have been rejected by either the payer or by DentalXChange.
- Select the Rejected Claims (#) link to view the list of claims.
- Select the link below to view the video tutorial on this subject.
 Resubmit a Rejected Claim

- Select the Rejected link in the Status column to view the errors.
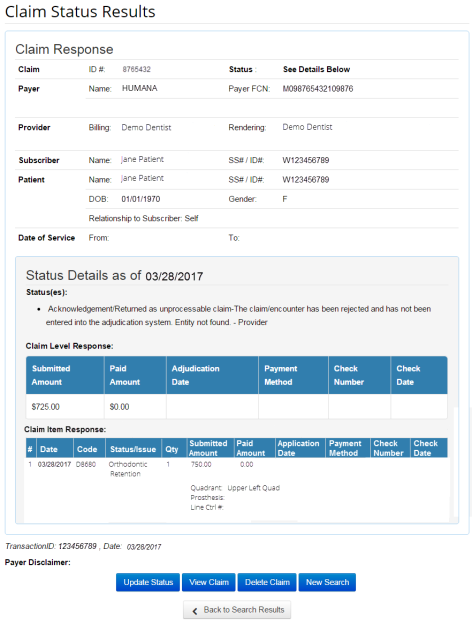
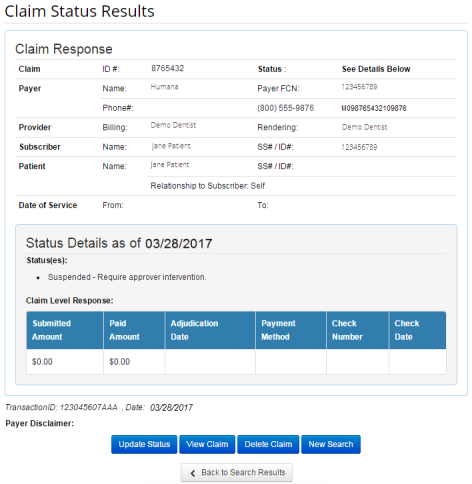
- The Claim Status Results page displays.
- The rejection reason displays in the Status(es) section of the Claim Response.
- Select an action at the bottom of the Claim Status Results to proceed.
- Select View Claim to start the resubmission process.
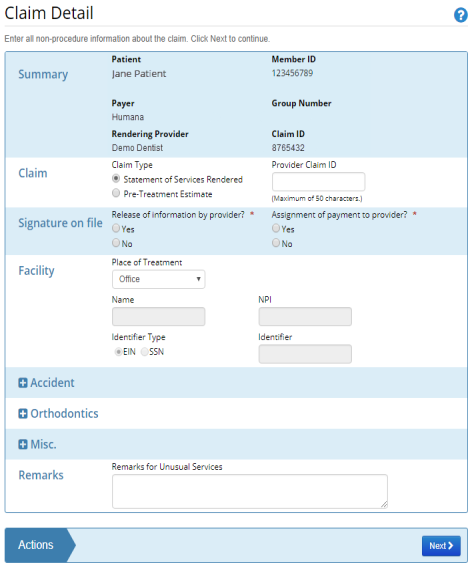
- The Claim Form displays with new available actions at the bottom of the page.
- Select an appropriate action at the bottom of the page.
- Select the Edit Claim to Resubmit button.

- ClaimConnect creates a new claim and displays the Claim Detail page.
- Select the Next button to proceed and create the new claim.
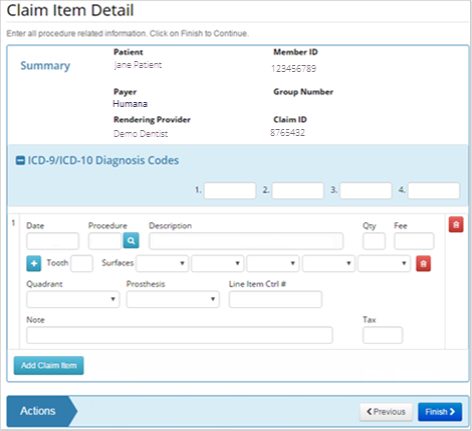
- Make corrections to the Claim Item Detail as necessary.
- Note: The Claim Item Detail is prefilled with information from the rejected claim.
- Select the Finish button.
- The claim form opens and is ready for edits.
- Make any additional edits to the Claim Form by selecting the appropriate Edit button in the desired section of the claim form.
- Select an action at the bottom of the claim to proceed when all corrections have been made.
- Note: During claim resubmission a new claim with a new Claim ID is created.

Claims Awaiting Submission
Claims Awaiting Submission are claims that have passed all validation requirements and have been saved for later submission. These claims can still be modified before submission. Any modifications will send the claim through the validation check again.
- Select the Claims Awaiting Submission (#) link to view the list of claims.

- Select the Ready for Submission link in the Status column.
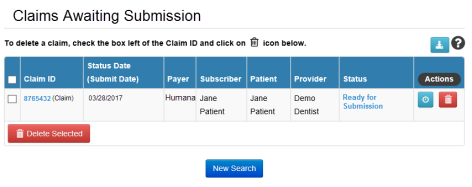
- The Claim Form displays. See DDE Claim Submission for more information on editing the claim form if necessary.
- Select an action at the bottom of the claim to proceed.

Claims Needing Attachments
Claims Needing Attachments collectively refers to any claims with procedure codes that typically require an attachment for processing. Attachments are supplemental pieces of information that may include items such as x-rays, periodontal charts, and narratives.
- Select the Claims Needing Attachments (#) link to view the list of claims.

- Claims needing attachments may have one of a variety of claim statuses based on the provider’s attachment solution and/or the part of the validation process the claim is currently in. Statuses include:
- Attachment(s) Needed
- Received/Suspended
Attachment(s) Needed
- When a provider with the DentalXChange Attachment Services package has entered a claim requiring an attachment but has not included the attachment.
- Select the Attachment(s) Needed link in the Status column.
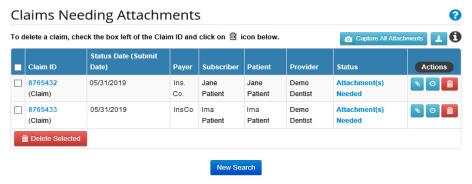
- The Claim Form displays.
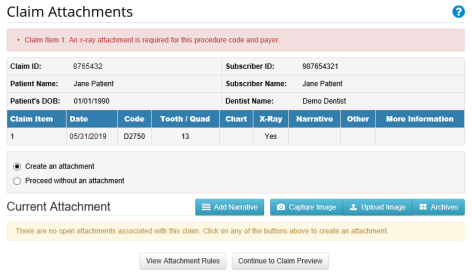
- Select the Manage Attachments button
 in the Attachment Information section to clear the error.

- Providers with DentalXChange Attachment Services Application will be able to select Create an attachment with the software and complete the attachment process.
- Providers with DentalXChange Attachment Services have the opportunity to select Create an attachment or Proceed without an attachment to complete the attachment process. See Claims Needing Attachment in the DentalXChange Attachment Services Section for more information on the available options.
Received/Suspended
- Claims receive the status of Received/Suspended when there are no further ClaimConnect generated errors, the claim has been sent to the payer, but the payer requires additional information before the claim can be adjudicated.
- Select the Received/Suspended link in the Status column.
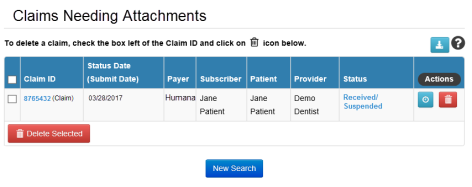
- The Claim Status Results display.
- The received/suspended reason displays in the Status(es) section of the Claim Response.
- Select an action at the bottom of the Claim Status Results to proceed.
- Select the View Claim button to review the claim if desired.
- When a claim is flagged with the Received/Suspended status, there is no further action to be taken in ClaimConnect. The provider should wait for direct contact from the payer.
- When the issue is resolved revisit the Claim Form and select the Mark as Resolved button to update the claim status.

Claims Marked as Pending
- Claims may be marked as pending awaiting further information.
- When marking a claim as pending a pop-up appears where a reason may be entered as to why the claim has this status and what information is awaiting submission.
- Select the link below to view the video tutorial on this subject.
 Mark a Claim as Pending
 Pend a Claim when Information is Missing

- When marking a claim as pending a pop-up appears. Enter a note or reason for the pend action and select Save.
- The claim is now flagged as Pending.
- Select the Claim ID when ready to submit, adding the information required.
- Select the Submit Claim button to proceed.
View Today's Activities
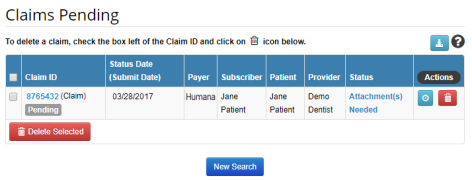
The View Today’s Activities section of the Claim/Encounter Search page provides quick links to all the claims, pretreatment estimates, and encounters that were entered in to the system today, or had a status update today.
- Select one of the links to view a list of all the claims, pretreatment estimates, or encounters entered or updated today.
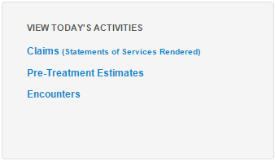
- A list of claims meeting the search criteria displays.
Claim Search
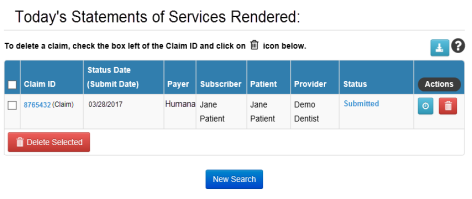
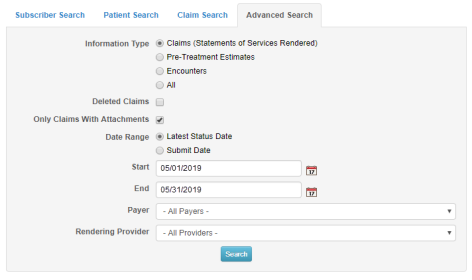
The Search section of the Claim/Encounter Search page is used to search for a claim using the Subscriber ID, patient last name, or the ClaimConnect Claim ID or Provider Claim ID.
- Select the appropriate tab for the information on hand.
- Use the Subscriber Search tab to enter a Subscriber ID as the search criteria.

- Use the Patient Search tab to enter the patient last name as the search criteria.

- Use the Claim Search tab to enter either the ClaimConnect Claim ID or the Provider Claim ID as the search criteria.

- If none of this information is available, or to filter a search for Only Claims With Attachments, use the Advanced Search function.
Upload Files
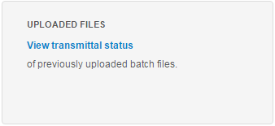
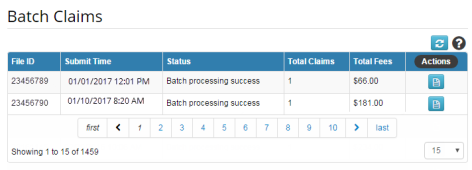
The Upload Files section of the Claim/Encounter Search page is used to review the status of submitted batch claims.
- Select the View Transmittal Status link to view a list of batch files uploaded to ClaimConnect.
- Select the Claims List button
 for the batch file to be reviewed.
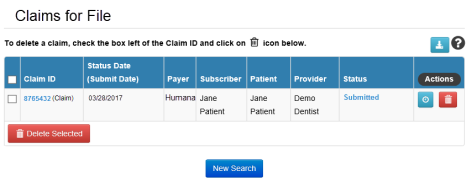
- A list of claims included in the batch file displays for review.
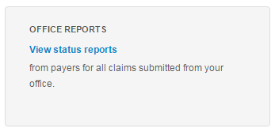
Office Reports
Office Reports are available for Denti-Cal provider use.
- Select the View Status Reports link to view a list of office reports available through ClaimConnect.
- A list of office reports displays.

- Select the Report ID link for the document to be reviewed.
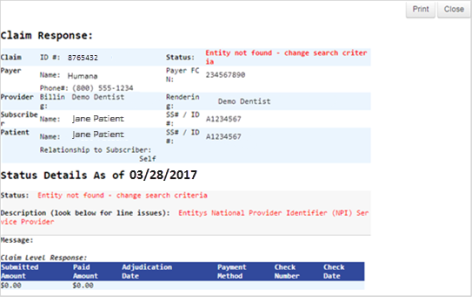
- Select the Download button
 to download an EDI File (835) for import in to a Practice Management System.
 - Select the Previously Read Reports
 button to review a list of documents that were previously reviewed.
 - Select Back to Unread Reports
 button to return.
*For further assistance, please Contact Us