Claim & Encounter Submission
Types of Claims
Visit our Video Library for more helpful tutorials.
What different types of claims are there?
- Claims – Statements of services that the provider uses to bill the payer (insurance company) for payment of services rendered. Dental insurance is designed to pay a portion of the costs associated with dental care.
- Primary insurance claim – Claim created for the primary insurance carrier.
- Secondary insurance claim – Claim created for the secondary insurance carrier. Secondary insurance only applies to patients with dual insurance coverage.
- Select the link below to view the video tutorial on this subject.
-
 Create a Secondary Claim with a Primary Claim
 Create a Secondary Claim After a Primary Claim
- Predetermination – A claim that is submitted to the payer (insurance company) for a preapproval before the procedure is performed. This is also referred to as a preauthorization or pretreatment estimate based on the payer guidelines.
- Select the link below to view the video tutorial on this subject.
 Create a Pretreatment Estimate
- Encounters – Claims submitted for patients with Dental Health Maintenance Organization (DHMO) insurance plans.
- Select the link below to view the video tutorial on this subject.
-
 Create an Encounter
Parties Involved
What parties are involved?
- Payer – Insurance carrier responsible for administering insurance and adjudicating claims.
- Submitter – User submitting the claim. A user may be the dental office staff, provider, or practice.
- Rendering Provider – The dentist who actually performs treatment on the patient.
- Billing Provider – The dentist or entity that receives payments from the payer.
- Clearinghouse – Processes or facilitates the processing of health information received from another entity in a nonstandard format or containing nonstandard data content in to standard data elements or a standard transaction. Also receives a standard transaction from another entity and processes or facilitates the processing of health information in to nonstandard format or nonstandard data content for the receiving entity.
- Trading Partners – Clearinghouses contracted with DentalXChange for services.
- Vendors – Practice Management System software companies that DentalXChange works with to facilitate claim submission and all other supported integrated transactions.
- Single Office Provider – A dentist who owns his own practice; a solo practice.
- DSO – Dental Service Organizations (DSO). A large group practice comprised of multiple locations such as a franchise.
- Office Manager – Manages office functions for the provider or a large group practice.
- Patient – Person who receives dental services.
DDE Claim Submission
|
|
Health Care Claim Transaction ASC X12 837, also: 837 and 837D (Dental) |
Direct Data Entry (DDE) Claims is an online solution for generating, monitoring, and submitting claims and pretreatment estimates to insurance payers directly through DentalXChange. The DDE Claim form allows a provider to submit one claim or pretreatment estimate at a time through the DentalXChange website. No PMS is needed.
- Select the link below to view the video tutorial on this subject.
 Create a Claim
 Understanding User Generated Statuses
- From the Dashboard page, under Electronic Claim Services, select the Single Claim button, or
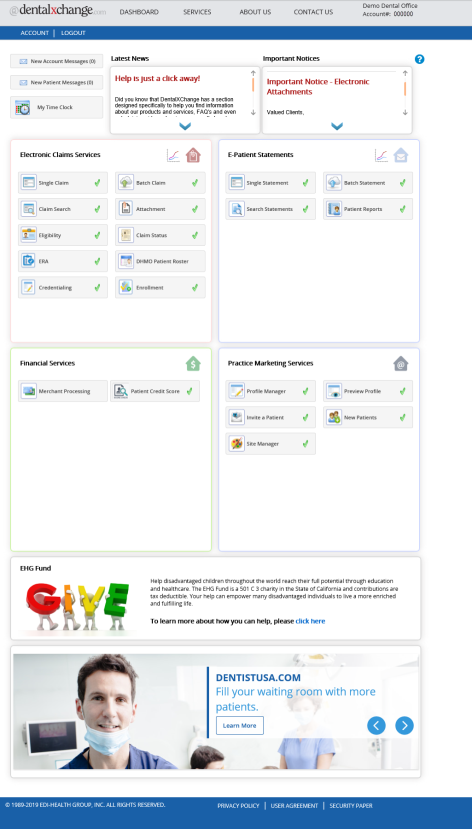
- From the Welcome to ClaimConnect page, select the Claim link in the Submission section of the menu.
- Accept the End User License Agreement (EULA) upon first log in.
Start a Claim
- Select the link below to view the video tutorial on this subject.
 Create a Claim
- Action buttons appear at the bottom of the page with available actions.
- Select the Cancel button to revoke the claim.
- Correct the errors and select the Create Claim button to proceed without validation errors.
- Select the Continue with Errors button to proceed with outstanding errors.

- Enter provider, patient and payer information.
- Note: Fields not marked with an asterisk (*) may be required by the payer. Errors display for affected fields.
- Select Next to proceed.
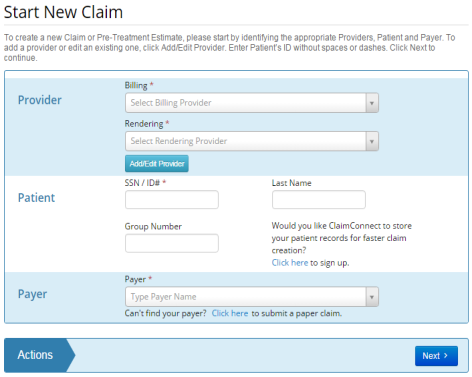
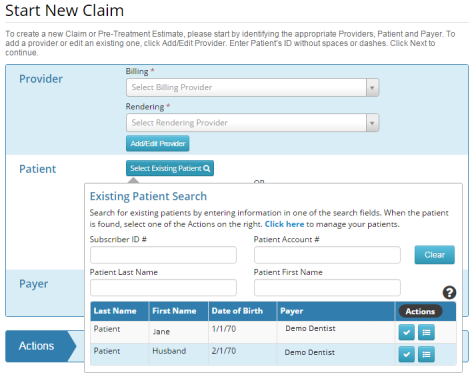
- Providers with Patient Storage can select a patient from the Existing Patient list.
- Select the Select Existing Patient button to access the list of existing patients.
- Enter new patient information to add a patient to the existing patients list.
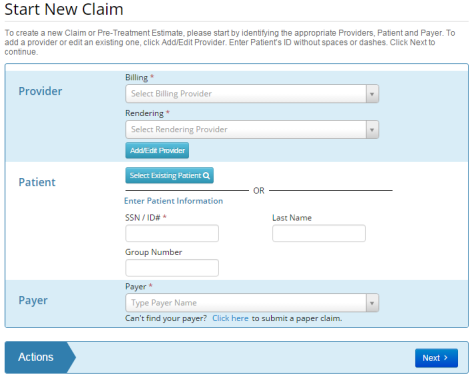
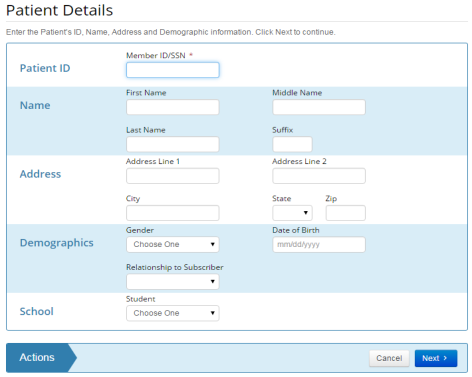
- Enter patient details.
- Note: All information entered must match the payer’s records.
- Select Next to proceed.
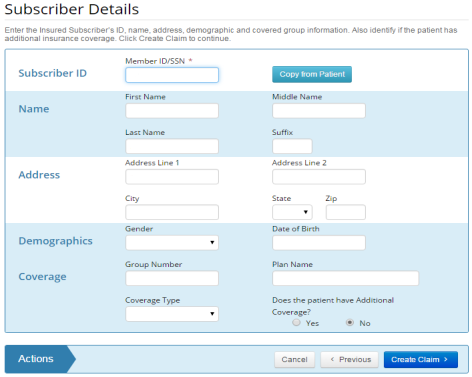
- Enter subscriber details.
- Select the Copy from Patient button to copy all the information from the Patient Details page.
- Select Yes in the Additional Coverage field if applicable.
- Note: Information populates from the previous page if the patient and subscriber are one and the same.
- Select Create Claim to create the claim.
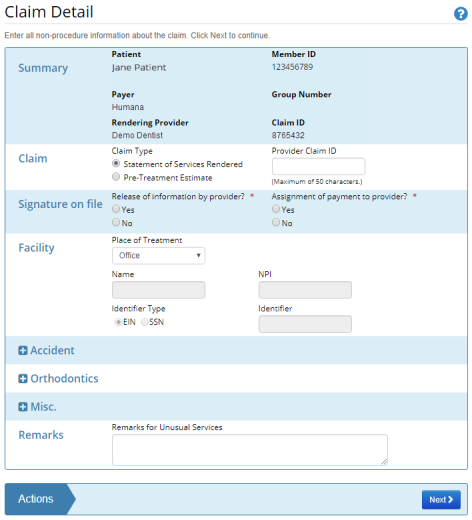
- Enter claim detail information.
- The Claim ID is the ClaimConnect generated Claim ID. The Claim ID is a unique number generated by ClaimConnect to identify the claim.
- Update the Claim Type based on the type of service rendered.
- Select Statement of Services Rendered for claims.
- Select Pretreatment Estimate for predeterminations.
- Select the link below to view the video tutorial on this subject.
 Create a Pretreatment Estimate
- Enter a Provider Claim ID where applicable.
- Select Yes for the Signature on File questions to confirm that the patient signature is on file authorizing release of health information, and payment respectively.
- Complete the Facility section fields as necessary.
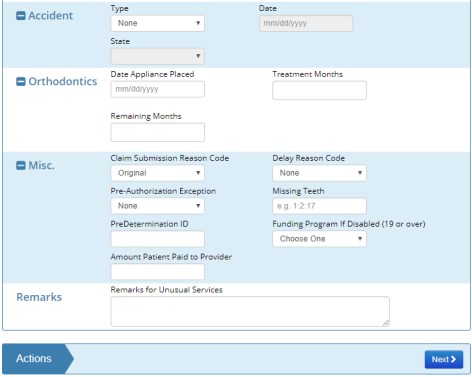
- Select expand buttons
 to expand sections that are collapsed. Complete sections as necessary.
 - Note: If the Place of Treatment is Office, the remaining fields in the Facility section are grayed out and require no additional information.
- Note: Should Orthodontics section be used, user must select Is it Ortho related Yes/No as a required field. Enter all required information.
- For Batch Claims, the Remarks section may be used to flag claims that need to be stopped for attachments to be added later. To flag a claim to be stopped, enter DXC#STOP in the Remarks section. To flag a claim to not be stopped, enter DXC#NOSTOP in the Remarks section.
- Select Next to proceed.
- Under the Claim Item Details enter in the appropriate information regarding the date of service, procedure code, quantity, fee, tooth surface and any other additional information required.
- Select the link below to view the video tutorial on this subject.
-
 Labeling Teeth on a Claim Form
- Enter ICD Diagnosis Codes where applicable.
- Enter claim item detail.
- Select the Search button
 to locate unfamiliar procedure codes.
 - Select the Add button
 to add additional tooth information.
 - Select the Delete button
 to delete the claim item.
 - Enter a Line Item Ctrl # to create an identifier to be returned by the payer on the ERA.
- Select the Add Claim Item button to add additional claim items.
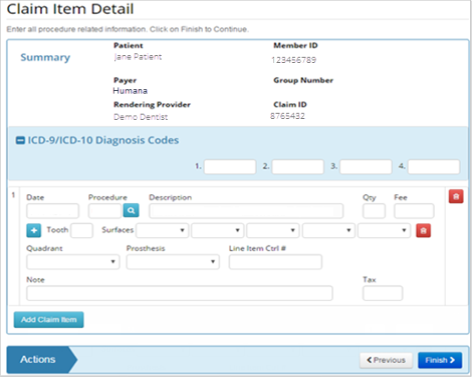
- Note: Additional required items may appear dependent on selections made.
- Enter an Initial Placement Date when Replacement is selected for the Prosthesis type.

- Enter a Diagnosis Pointer when an ICD Code is designated. The Diagnosis Pointer associates the procedure to the specified ICD Code.

- Select Next to proceed.
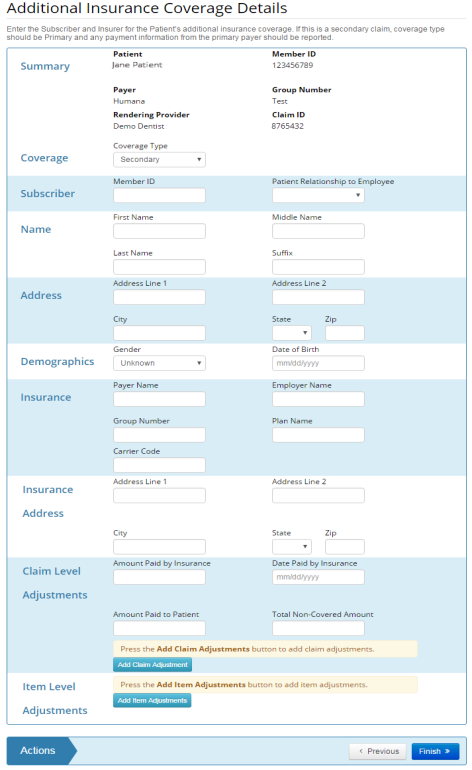
- Enter additional insurance coverage where applicable.
- The Additional Insurance Coverage Details page only appears if the user selected the Yes option in the Additional Coverage field on the Subscriber Detail page.
- Errors appear in red at the top of the page.

- Select Finish to proceed.
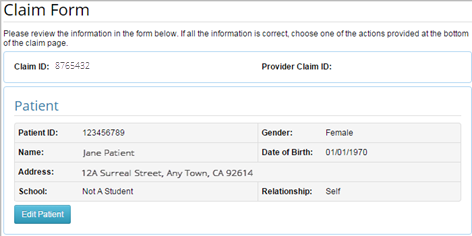
- The completed Claim Form displays.
- Review claim information for accuracy.
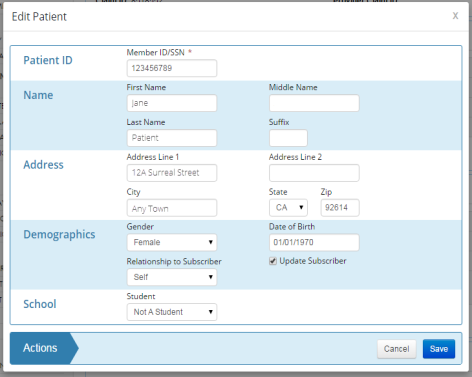
- Select the edit button in sections requiring edits where applicable.
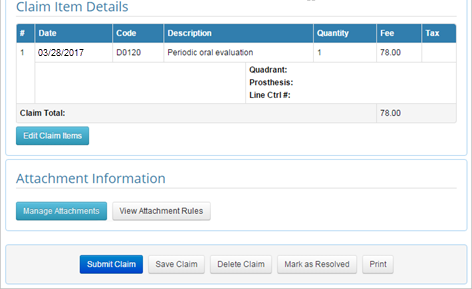
- A pop-up displays to allow edits.
- Select Save to proceed.
- Select an action at the bottom of the claim to proceed.

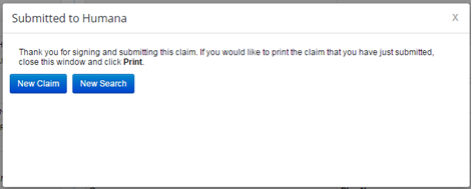
- Submit Claim sends the claim to the payer and displays a confirmation message.
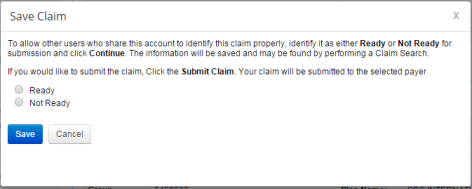
- Save Claim changes the claim status to Awaiting Submission.
- Select the link below to view the video tutorial on this subject.
 Save a Claim for Later
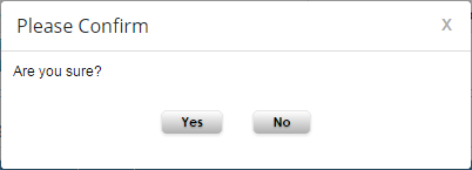
- Delete Claim changes the claim status to Deleted. The claim will remain in the account records but can no longer be submitted.
- Select the link below to view the video tutorial on this subject.
 Delete a Claim
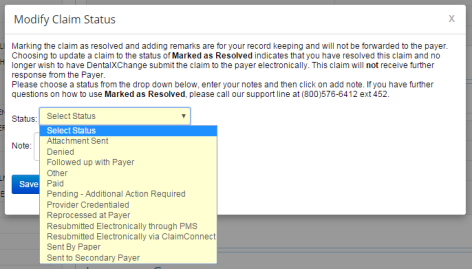
- Mark as Resolved allows custom status selection from a drop-down list with a user specified note. The claim will remain in the account records but can no longer be submitted.
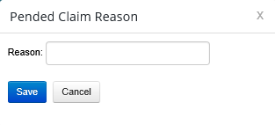
- Mark as Pending when further information is required for later submission.
- Select the link below to view the video tutorial on this subject.
 Mark a Claim as Pending
 Pend a Claim when Information is Missing
Batch Claims
|
|
Health Care Claim Transaction ASC X12 837, also: 837 and 837D (Dental) |
Batch Claims allow a provider to submit claims to a payer directly through the DentalXChange site using a PMS. The provider can track and monitor these claims in ClaimConnect. The word batch refers to the process of submitting multiples at one time. Each batch of claims submitted to DentalXChange from a PMS generates a batch file. Based on the level of software integration with ClaimConnect, the Batch claim files are submitted via Post, Upload, or Capture.
A Practice Management System (PMS) is software used to assist with daily operations of a dental practice PMS's allow users to capture patient information, schedule appointments, maintain a list of insurance payers, perform billing tasks, send claims, and generate reports.
- Select the link below to view the video tutorial on this subject.
-
 Batch Claims Overview
Post
Batch claims are submitted using the Post method when the PMS is fully integrated with ClaimConnect. The DentalXChange account username and password are embedded in the PMS software allowing direct access to ClaimConnect.
- A confirmation message displays when a batch has been successfully transmitted from the PMS to ClaimConnect.
Upload
Batch claims are submitted using the Upload method when the PMS is not fully integrated with ClaimConnect nor compatible with the DentalXChange Management Desktop (DMD). A batch of claims is created within the PMS, which in turn generates a claim file or enter single claims using Direct Data Entry.
- From the Dashboard page, under Electronic Claim Services, select the Batch Claim button, or
- From the ClaimConnect Welcome page select the Batch Claim link in the Submission section of the menu.
- Accept the End User License Agreement (EULA) upon first login.
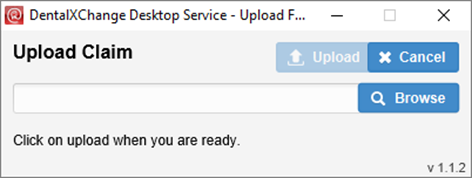
- Select the Upload Claims button to submit the claim file.

The Upload option is visible to providers who have selected compatible PMS software during Worry Free Registration.
- Navigate to the location of the file by selecting the Browse button.
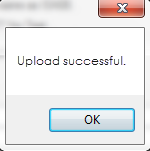
- A pop-up will appear upon Successfully uploading the file.
- Select Close.
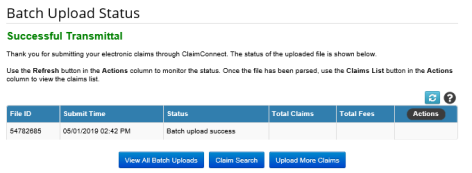
- The Successful Transmittal message displays upon successful upload.
- Ensure View All Batch Uploads button is selected to view and correct any errors that may have occurred.
Capture
Batch claims are submitted using the Capture method when the PMS is not integrated with ClaimConnect, and if the PMS either doesn’t create a claim file, or the claim file format created is incompatible with the ClaimConnect Upload method. In this case, use the DentalXChange Management Desktop (DMD) application to capture the information from nonintegrated PMS. The DMD is a virtual printer that allows DentalXChange to capture the information for electronic submission. It must be installed on the provider's computer before items can be submitted and can be downloaded from the Provider's DentalXChange account.
- From the Dashboard page, under Electronic Claim Services, select the Batch Claim button, or
- From the ClaimConnect Welcome page select the Batch Claim link in the Submission section of the menu.
- Select the Printer Friendly DMD Guide button to view the DMD reference guide.
- Select the Download and Install DMD button to proceed with DMD download.
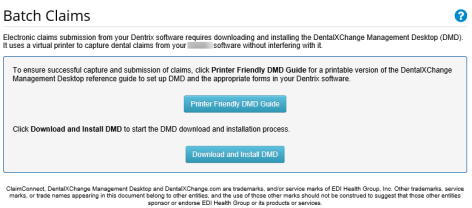
The Capture option is visible to providers who have selected compatible PMS software during Worry Free Registration.
- Select the Download button to begin DMD install.
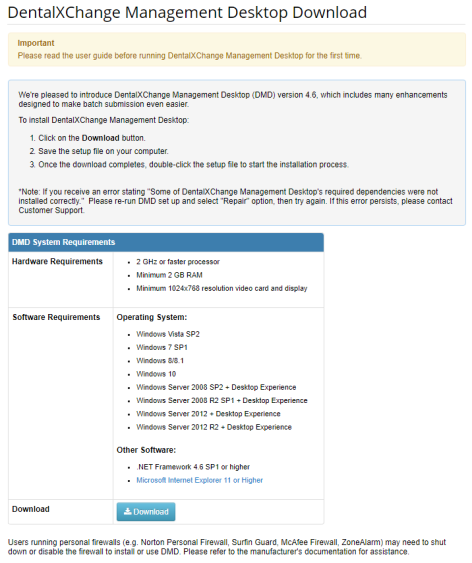
- Select the executable DMD file in the saved location.
![]()
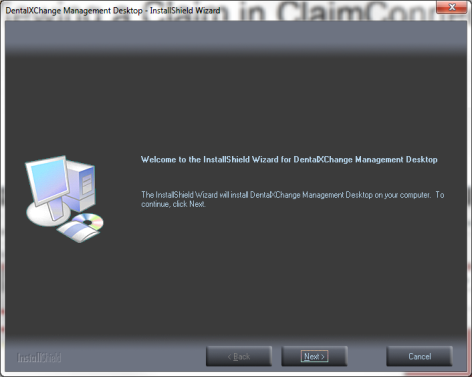
- Select the Install button.
- Select the Next button.
- Review and accept the End User License Agreement (EULA).
- Select the Next button to proceed.
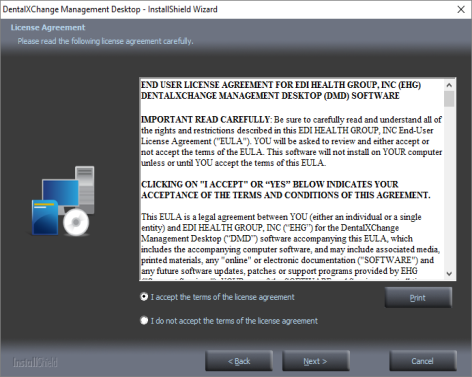
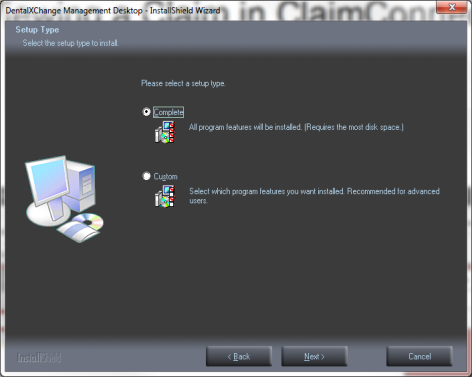
- Select the Complete option.
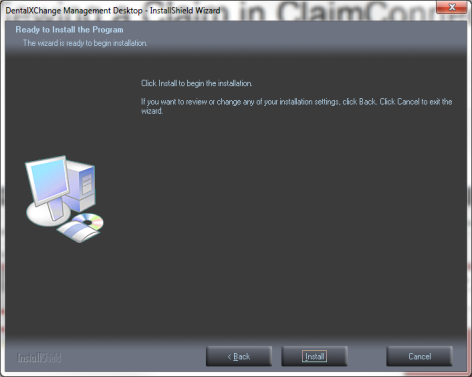
- Select the Install button.
- Select the Finish button when installation is complete.
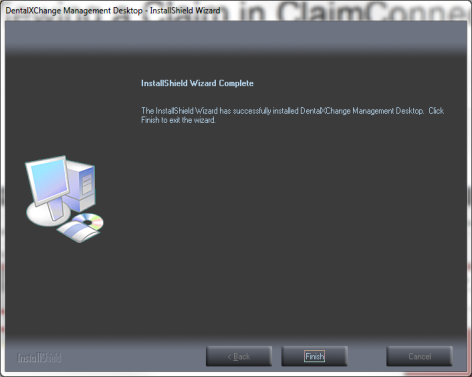
- A DMD Shortcut displays on the desktop upon completion of installation.
- Select the DMD Shortcut on the desktop to open the DMD.
![]()
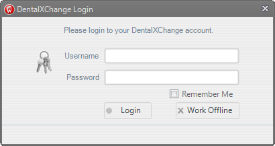
- Enter the DentalXChange account login information.
- Select the Login button to start the DMD.
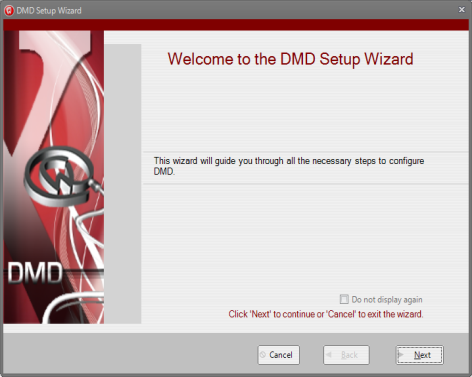
- The DMD Setup Wizard launches on first login.
- Select the Next button.
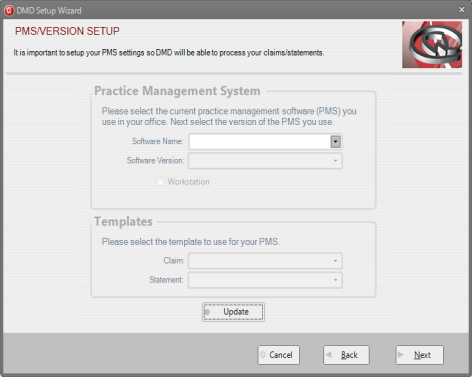
- Select the Software Name/Version of the Practice Management System used at the practice.
- Select the Next button.
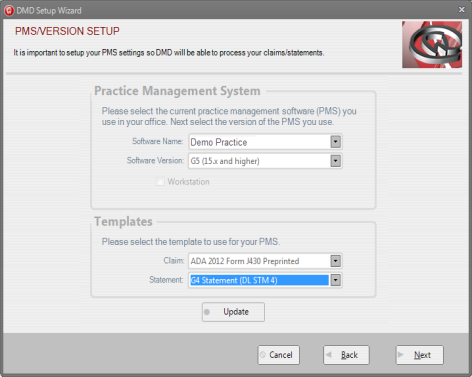
- Select the Template to be used based on the PMS previously selected.
- Select the Next button.
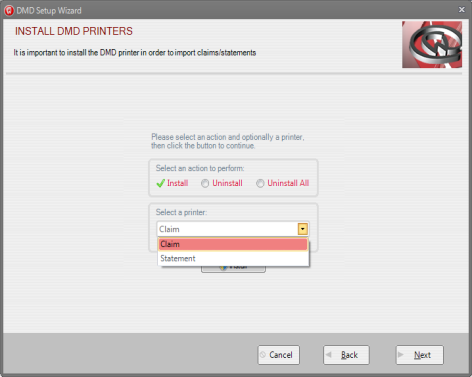
- Select the Install option.
- Select Claim from the Select a Printer option to setup the claim capture option.
- Users may return to the DMD Setup Wizard at a later time to setup the statement capture option if needed.
- Select the Install button.
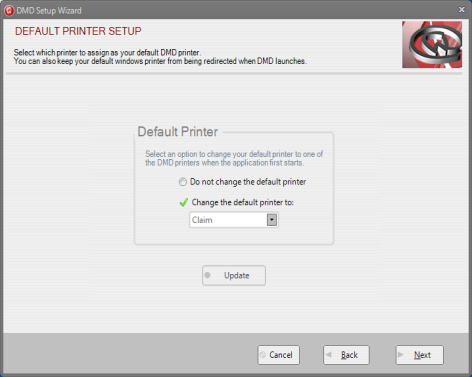
- Select the Next button once the default printer is set up.
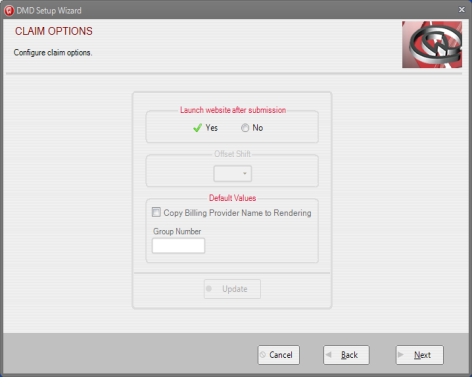
- Select YES in the Launch Website after Submission field.
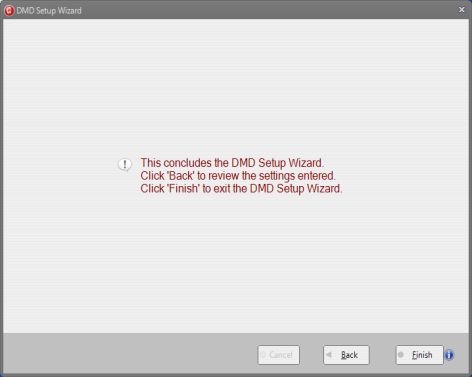
- Select the Finish button to complete setup when all necessary printers have been configured.
- There are two ways the DMD can be used to transmit claims to ClaimConnect:
- Print to DMD, or
- Manually Import in to DMD.
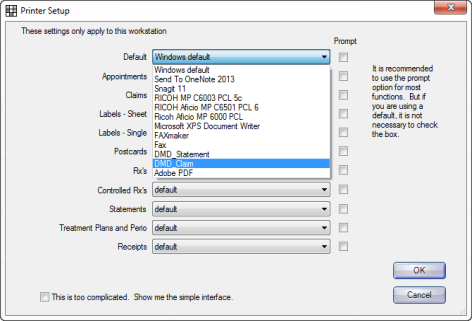
Print to DMD
Some PMS software allow a user to set DMD as a default printer and print claims directly to the DMD.
- See the DMD specific website for more information on DMD setup.
Manually Import to DMD
Claims can be manually imported in to the DMD if the provider PMS does not allow a user to set DMD as the default printer.
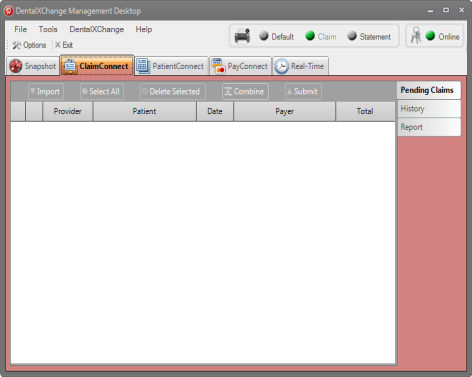
- Print the claim(s) from within the PMS according to the guidelines for that PMS.
- Select the ClaimConnect tab in the DMD.
- Select the Import button.
View & Submit Claims
When claims have been imported in to the DMD, either by printing to the DMD, or by manually importing to the DMD, they can be reviewed and submitted to ClaimConnect
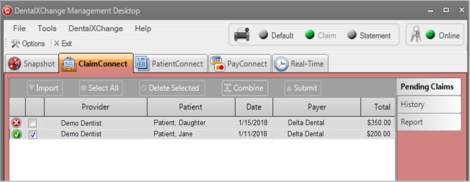
- View claims on the ClaimConnect tab.
-
 Displays next to claims that are ready to submit.
 -
 Displays next to claims that have a validation error.
 - Claims with validation errors must be corrected before submitting.
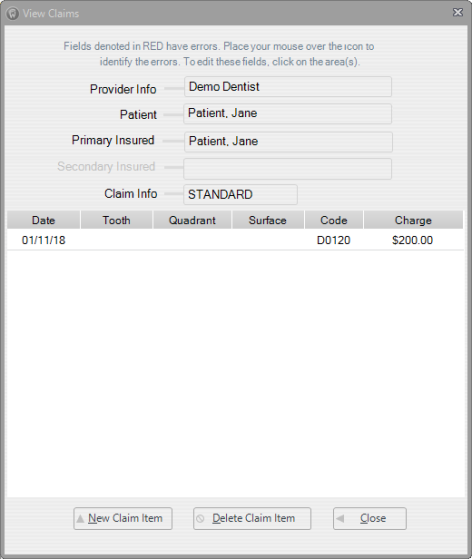
- Double-click a claim from the claim list to view more information or to correct validation errors.
- Claim information displays in a separate window.
- Validation errors are denoted in red.
- Fields with validation errors can be edited by selecting the affected field.
- Select the Close button to close the View Claims window.
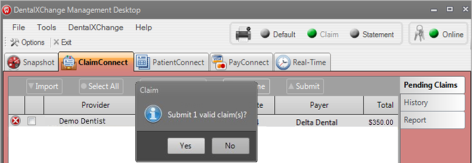
- Select the Submit button to submit claims to ClaimConnect.
- Select the Yes button on the pop up window to confirm submission.
- The DentalXChange site launches when claims are submitted successfully and opens to the Claim/Encounter Search page.
Encounters
|
|
Health Care Claim Transaction ASC X12 837, also: 837 and 837D (Dental) |
The Encounters form allows providers to generate, and submit encounters and Dental Health Maintenance Organization (DHMO) pretreatment estimates to insurance payers directly through DentalXChange. Similarly to the DDE Claim form, the Encounters form allows a provider to submit one encounter or pretreatment estimate at a time through the DentalXChange website. No PMS is needed.
- Select the link below to view the video tutorial on this subject.
-
 Create an Encounter
 Create a Pretreatment Estimate
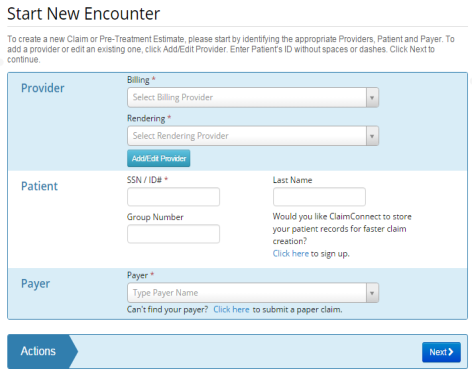
- From the ClaimConnect Welcome Page select the Encounter link in the Submission section of the menu.
- Enter provider, patient and payer information.
- Note: Fields not marked with an asterisk (*) may be required by the payer. Errors display for affected fields.
- Select Next to proceed.
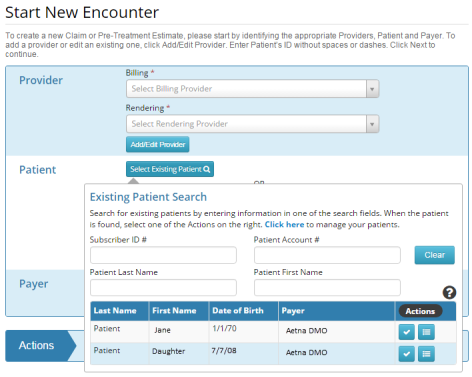
- Providers with Patient Storage can select a patient from the Existing Patient list.
- Select the Select Existing Patient button to access the list of existing patients.
- Enter new patient information to add a patient to the existing patients list.
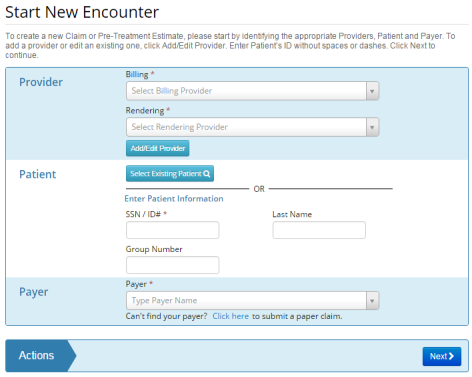
- Enter patient details.
- Note: All information entered must match the payer’s records.
- Select Next to proceed.
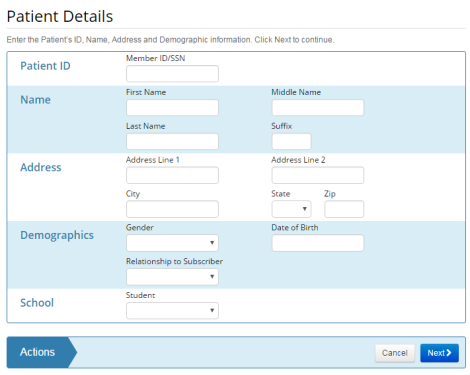
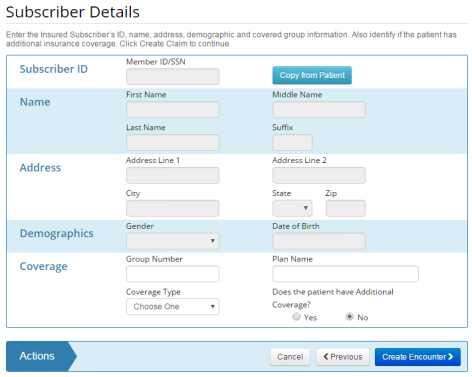
- Enter subscriber details.
- Select the Copy from Patient button to copy all the information from the Patient Details page.
- Select Yes in the Additional Coverage field if applicable.
- Note: Information populates from the previous page if the patient and subscriber are one and the same.
- Select Create Encounter to create the claim.
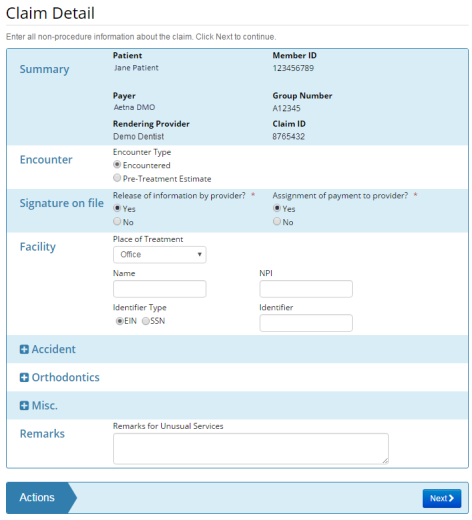
- Enter encounter detail information.
- The Claim ID is the ClaimConnect generated Claim ID. The Claim ID is a unique number generated by ClaimConnect to identify the claim.
- Update the Encounter Type based on the type of service rendered.
- Select Encountered for claims.
- Select Pretreatment Estimate for predeterminations.
- Select the link below to view the video tutorial on this subject.
 Create a Pretreatment Estimate
- Select Yes for the Signature on File questions to confirm that the patient signature is on file authorizing release of health information, and payment respectively.
- Complete the Facility section fields as necessary.
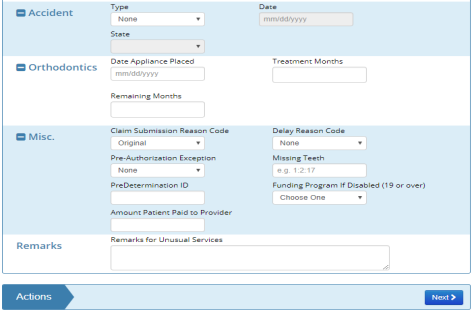
- Select expand buttons
 to expand sections that are collapsed. Complete sections as necessary.
 - Select Next to proceed.
- Enter ICD Diagnosis Codes where applicable.
- Enter encounter item detail.
- Select the Search button
 to locate unfamiliar procedure codes.
 - Select the Add button
 to add additional tooth information.
 - Select the Delete button
 to delete the claim item.
 - Enter a Line Item Ctrl # to create an identifier to be returned by the payer on the ERA.
- Select the Add Claim Item button to add additional claim items.
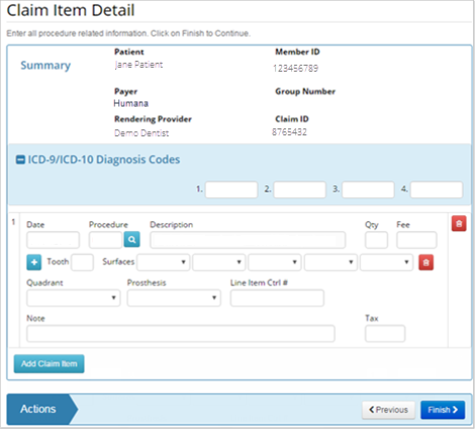
- Note: Additional required items may appear dependent on selections made.
- Enter an Initial Placement Date when Replacement is selected for the Prosthesis type.

- Enter a Diagnosis Pointer when an ICD Code is designated. The Diagnosis Pointer associates the procedure to the specified ICD Code.

- Select Next to proceed.
- Enter additional insurance coverage where applicable. The Additional Insurance Coverage Details page only appears if the user selected the Yes option in the Additional Coverage field on the Subscriber Detail page.
- Select the link below to view the video tutorial on this subject.
 Create a Secondary Claim with a Primary Claim
 Create a Secondary Claim After a Primary Claim
- Select Finish to proceed.
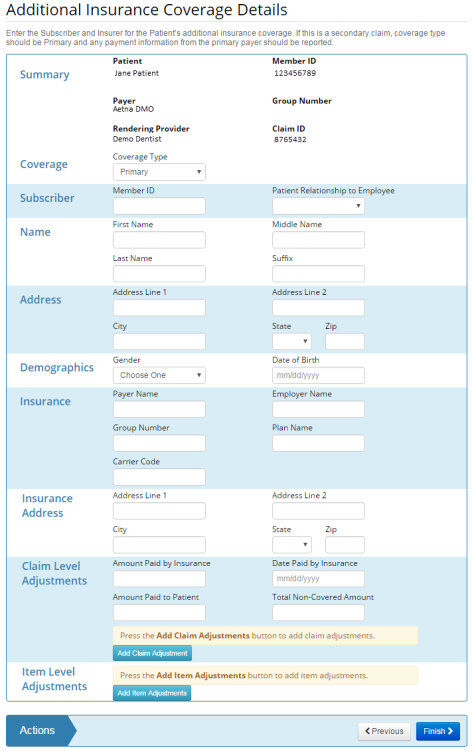
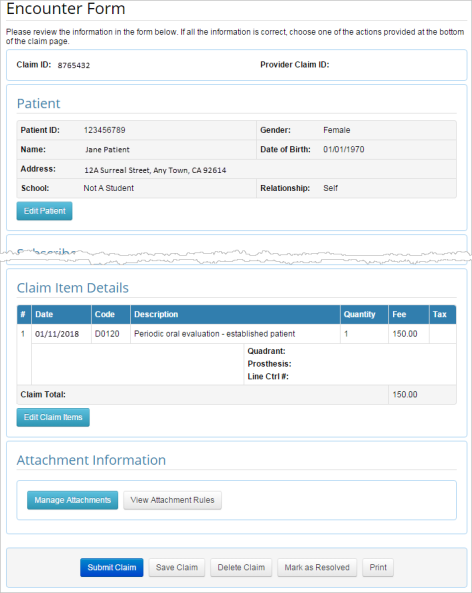
- The completed Encounter Form displays.
- Review encounter information for accuracy.
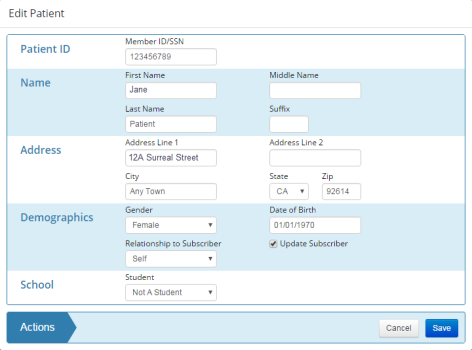
- Select the edit button in sections requiring edits where applicable.
- Pop-up displays to allow edits.
- Select Save to proceed.
- Select an action at the bottom of the claim to proceed.

- Submit Claim sends the claim to the payer and displays a confirmation message.
- Save Claim changes the claim status to Awaiting Submission.
- Select the link below to view the video tutorial on this subject.
 Save a Claim for Later
- Delete Claim changes the claim status to Deleted. The claim will remain in the account records but can no longer be submitted.
- Select the link below to view the video tutorial on this subject.
 Delete a Claim
- Mark as Resolved allows custom status selection from a drop-down list with a user specified note. The claim will remain in the account records but can no longer be submitted.
- Mark As Pending after submitting a batch of claims, claims that have been stopped because of validation errors, duplication or missing attachments, may be marked as pending while additional information is gathered.
- Select the link below to view the video tutorial on this subject.
 Mark a Claim as Pending
 Pend a Claim when Information is Missing
- Print prints the claim.
*For further assistance, please Contact Us

